Sydney Level 2 Water Restrictions
With level 2 water restrictions now in place in Sydney, and other levels of water restrictions in place across different parts of the country, it's important that we have a look at what you can do to still care for your car in this situation.
We're going to focus on the level 2 water restrictions in Sydney for this article - what you can do and how to still wash your car effectively.
If you're in another part of the country that has different restrictions in place, it's important that you check with your local council in relation to what is, and what isn't allowed for cleaning your car. There's more information on this, including links on how to find your local council to petition to the state at the bottom of this article.
What we are doing, is still using a pressure washer to wash our vehicle, but we're feeding it with a water drum/container, using gravity and the pump in the pressure washer to do the work. This is a great way to ensure your water usage stays low while washing your car.
It should be noted that using rain water from a tank is completely fine (as long as the tank isn't topped up from, or switched to, the drinking water supply)
Be sure to contact your local council member to petition to Sydney Water in relation to using pressure washers to wash your car in level 2 water restrictions. It is important that you get the correct information for your area.
To contact Sydney Water yourself, you can call them on - 1300 143 734
For a full list of the level 2 water restrictions, see the following link on Sydney Water's website - http://www.sydneywater.com.au/SW/water-the-environment/what-we-re-doing/water-restrictions/index.htm
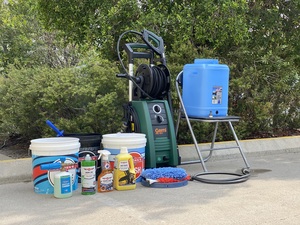
What you'll need
Here is what you'll need:
Pressure Washer - different pressure washers have different flow rates, so check yours before starting to get an idea of how much water it will use. Ours is the Gerni 160.2, which uses 8.6L/min maximum water flow.
Water container with a hose bung in the bottom - critical it's at the bottom, as this setup is gravity fed to the pressure washer, so a bung at the top will not work. (20-30L capacity, with 30L being ideal. Autobarn sell a 20L one here, or Bunnings sell a 30L one here)
Shortened hose - (the one in our article here we cut to about 2m long)
Hose connector with control valve - (see link here)
Universal sprinkler adapter (or similar hose fitting) - (see link here)
Plumbers tape/Thread seal tape - (see link here)
The set up
Using the pressure washer in this way means that the water is gravity fed. It may be helpful to put the water drum up on a step, or on a table or something like that, so that it's higher than the pressure washer, to assist gravity in feeding water to the pressure washer.
- First thing to do is to apply some plumbers tape/thread seal tape to the thread on the sprinkler adapter that will go into the water drum. This will ensure you don't get any leaks from your water source and that you get a good seal.
- Take the lid off the drum (and leave it off - this helps with suction from the bottom bung), and unscrew the bung from the bottom of your water container, and screw in the sprinkler adapter. You may need a flat head screw driver or similar to remove the bung from the water drum. Have a look inside the water drum and make sure there's nothing in there that could potentially block the pressure washer (any foreign material, plastic, dirt etc).
- Hook up the control valve end of the hose to the bung in the water drum, and make sure it's set to stop the flow of water (we're about to fill the drum).
- Place something underneath the back of the water drum, so that it leans forward slightly (here we've used the trigger head of a hose, but a small piece of wood or something similar would be fine). This will help when the water drum becomes almost empty, as it's able to pick more water up from the bottom of the drum. We've used a hose head here.
- Fill your water drum and buckets for washing from your tap.

The hook up
- Set the water drum up next to your pressure washer and plug the other end of the hose into the pressure washer, then open the valve on the water drum end of the hose. This will start the flow of water into the pressure washer.
- Unplug the pressure washer hose from the handle of your presure washer and point it back into the water drum so you don't waste water here, then turn the pressure washer on so that it can start sucking water through its pump. This might take a little bit, so don't freak out.
- Once you start getting a good flow of water through the hose, turn the pressure washer off and reconnect the hose to the pressure washer. Your pressure washer is now primed, and ready to go.
During our testing, we found that 20L was enough to do a small sedan using a pressure washer with a flow rate of around 6L/min.
For bigger 4WD's or Van's, or when using a pressure washer with a higher flow rate (like our Gerni with 8.6L/min), 30L or more may be required.
If you find you need more water, turn the valve to the off position on the hose that's plugged into the water drum, unplug the hose from the pressure washer, take the water drum to the tap on your house and put some more water in it. Only put in around 5-10L at a time, and any remaining water in the drum can be stored and used for your next detail.

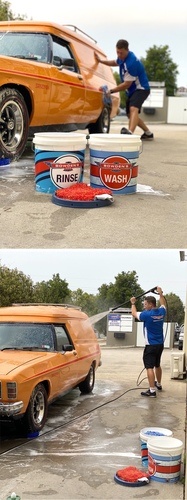
Wheels + Snow Job
The whole idea here is to be as efficient as possible with your water usage, so do the bulk of the cleaning with your bucket and brushes. If you want to use Wet Dreams now, you can, just keep in mind that it will use more water. If you want to apply a sealant to your wheels and not use Wet Dreams, Bead Machine would be perfect to use after washing and drying the whole car.
Quickly go around the car and spray Wheely Clean or Orange Agent in a sweeping motion onto the wheels, making sure to get into all the corners and crevices of the wheels. Immediately after spraying the last wheel, apply the Snow Job snow foam.
With your cannon mixture made up, it's important to work quickly here so that we are as efficient as we can be, to use as little water as possible.
This is the fastest and most efficient way for using the least amount of water possible when performing a Snow Job. To use the least amount of water, follow our process below:
- Start at the back of the car (being the dirtiest part of the car), at the bottom, then work your way to the top.
- Move onto the lower section of the side of the car, moving up and doing the roof last.
- Now do the front bar, moving up and onto the bonnet and windscreen.
- Switching now to the other side of the car, again do the lower part of the doors first, before moving up towards the roof last.
- This whole process should be a very quick one, so move quickly and be efficient with your movement.
For a detailed run through on this process, see the video below (note in this video we are using water from a rain tank, which is allowed during water restrictions):
With the Snow Job now over the whole car, quickly give your wheels a scrub with your Little Chubby brush using the Wheels bucket if you need, then pressure wash the whole car down, starting at the roof and working your way down, remembering to work efficiently.

Safe wash
Washing doesn't really change for us here, as we always want to give our vehicle the safest wash possible.
Using your favourite Bowden's Own wash, quickly froth the wash mixture up with the pressure washer, then using your favourite Bowden's Own wash tool, wash the car starting at the roof, and working your way down to the dirtier lower sections last. Always remember to go back into the Rinse bucket for fresh water after washing each section of the car.
TIP: After you dunk your wash tool into the Wash bucket suds, hold it above the bucket for a couple of second so you don't waste a bunch of water getting the wash tool to the actual paint.
Give the car a final rinse with the pressure washer, and then move onto drying.
Drying
Becuase we're not sheeting the water off the car after rinsing, we can cut our drying time with the cloths by using a small battery powered blower. If you have one, quickly go over the car and try to get rid of some of the standing water to make the drying process a little easier.
In our article, we've used The Big Green Sucker with Boss Gloss on it to help the drying process. You could also use the Twisted Pro Sucker or our After Glow drying aid to add more protection while you dry if you prefer this method.
The technique for using The Big Green Sucker is easy; drape The Big Green Sucker over your arm with the bulk of the towel hanging down. Holding the Boss Gloss at least 30cm to 40cm from the towel, mist 4-6 sprays of Boss Gloss straight into the towel. Flip the towel over and spray another 4-6 sprays on the other side. Then, grab each end of the towel and starting from the roof, slowly glide it across the wet surface, drying the water as you go. On the lower panels, fold the towel in half, so it cannot ever drop down and touch the ground.
If you're using After Glow, grab 2 Big Softie cloths and dampen one, then wring it out and fold it into quarters with the low pile side facing out. Spray 4-6 sprays of After Glow into the cloth and dry a section of the vehicle (a section might be half of a bonnet, a door etc). Wait for around 1 minute, then wipe off any remaining residue with a clean and dry Big Softie cloth. Wring out your first cloth, then spray 2 more sprays of After Glow into the cloth, and dry the next section - continue this method until the whole car is done.

Protecting your paint
If you're using Happy Ending or Wet Dreams using this method of washing, it will use more water, and you'll likely have to refill your water drum at some point. So another option is to use our other sealant products for added protection after the vehicle has been washed and dried.
After Glow is still fine to use as a drying aid, to dry the car with, and it will attract less dust. Use 2 Big Softie cloths, one damp, one dry. Spray 4-6 sprays of After Glow into the folded and damp Big Softie cloth and dry a section of the vehicle (a section might be half a bonnet), then with the clean and dry Big Softie, buff off any remaining residue. Spray 2-3 more sprays of After Glow into the damp Big Softie cloth for each subsequent section of the vehicle.
Further restrictions + Questions?
Other parts of Australia are already on level 4, 5, and higher water restrictions. For more information on what these mean for you, contact your local council to petition to the state for information in relation to these different levels of water restrictions.
We will continue to do our best to gather information from Sydney Water about these level 2 water restriction, and any subsequent water restrictions imposed by the government.
To find your local council, see the following links:
NSW - Find my council - https://www.olg.nsw.gov.au/find-my-council
QLD - Find my council - https://www.qld.gov.au/about/how-government-works/local-government-directory
VIC - Find my council - http://knowyourcouncil.vic.gov.au/councils
ACT - Find my council - https://www.accesscanberra.act.gov.au/app/answers/detail/a_id/246/~/act-community-councils
SA - Find my council - http://www.lga.sa.gov.au/councils
NT - Find my council - https://nt.gov.au/community/local-councils-remote-communities-and-homelands/find-your-council
WA - Find my council - https://www.mycouncil.wa.gov.au
For any further product or process related questions, drop us an email to info@bowdensown.com.au, or FREECALL 1800 351 308.
Happy detailing,
Brett Hobbs