Power Water Craft after ride cleaning and care
Aussies love the water
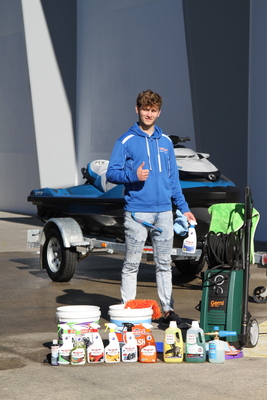
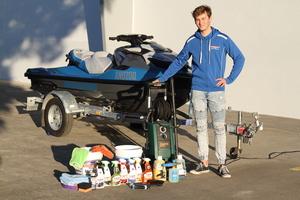
Like many Aussies, we love getting out on the water here in South East Qld, with a couple of Power Water Craft (PWC's, AKA Jet Ski's) in the stable that are used quite often. Over the last few years we have been doing a lot of testing and working out what was the best in our range to look after them - something that is not that straight forward due to the different surfaces used on them and what works to really protect them from the harsher marine environment as well.
So, read on for our easy to use system of Aussie gear that will work an absolute treat on your ride.
First things first
The very first thing you should be doing is having a read of your PWC's manual. All ski's are different and you should be aware of any subtle differences in them, to what we are showing here on the Sea-Doo models we have and use.
You want to wash the ski in a spot that's flat and preferably in the shade. If there is any incline, have it parked with the nose of the ski facing the higher area. Also, if you don't want to become a viral internet sensation, get some good wheel chocks on the trailer so it doesn't roll away on you - these can be found in many automotive stores.
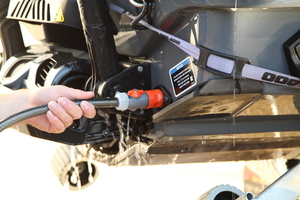
After each ride you should flush the engine, especially if you've been in salt water - check your ski's guide on how to do this. In the case of the Sea-Doo here, you can simply connect up a hose (don't turn it on just yet), then run the ski on idle and then turn the hose on. It's a good idea to have a hose (as pictured) with a flow valve on the end to make this easier. Leave it running for what the manufacturer recommends, which can be from 30 seconds to a minute. This will flush out shells, seaweed, sand, ski rope threads as well as importantly help prevent any dreaded corrosion before turning off, unclipping the hose and giving the engine a couple of few small revs to clear any remaining water out.
Salt free wash
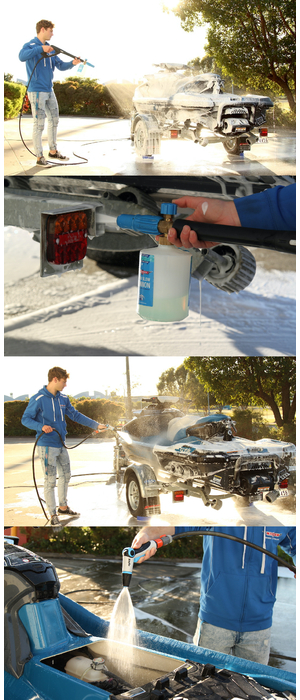
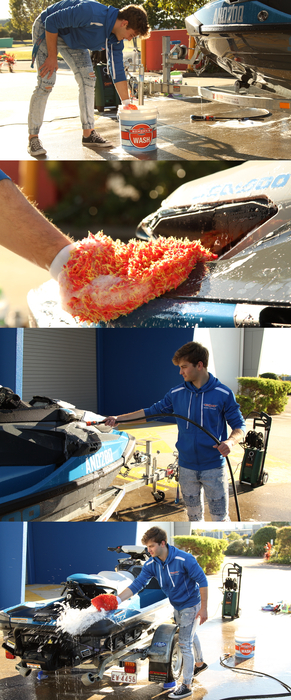
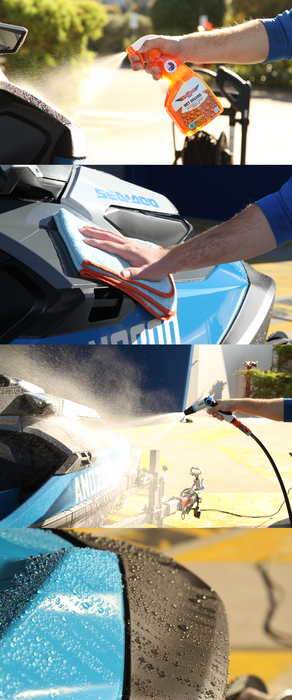
We like to start the wash with something fun and easy, with the Snow Job foam and Snow Blow Cannon hooked up to a pressure washer to put a lovely thick layer of foam over the ski. This foam does a stellar job at breaking down all the salt and fresh water mark build up from the surfaces on and around the ski.
Using it is simple; although we do change a few things compared to how we would use it on a vehicle. Start as per the product directions by mixing 100ml of Snow Job with 900ml of water in the cannon bottle, then screw the bottle to the cannon, before hooking it up to your pressure washer with the right adapter. Starting from one side at the front of the ski, spray the foam all over the ski and trailer from top to bottom, working your way slowly around it. We also like to turn the cannons front nozzle to a jet and spray the foam up into the rear trailer holes to flush out any salt, as they usually get a dunking in the water when loading and unloading the ski. Now leave it to sit for about 4 to 5 minutes and it will slowly emulsify the salt build up.
The ski's manufacturers all make mention that they don't like pressure washers being used on them, as excess water pressure can go past the seals on many of the parts, as well as if the lance is held too close to some of the more delicate surfaces, it can damage them. This is not an issue with the Snow Blow Cannon as it's a low pressure device, but issues could surface if you use the lance attachment to rinse it off. So in the interests of safety, we rinse it down with a spray hose attachment. This works well, as unlike a road going vehicle, you don't need the lances strong water pressure as there should be no heavier dust and grime to shift. The only time this is different is if you drive the ski home on a wet road and get road grime. Here you can use the pressure washer on the lower hull area, keeping the lance 30 to 50cm distance away from the surface, especially around the rear jet area. Don't ever use it on any electrical switches or gauges, just run a spray hose over these areas.
If you have been in salt water, it's a good time to take the seat off and water the engine bay area down with the spray hose, as per the manufacturer's instructions, which again will help prevent corrosion on exposed metal parts. Be sure to open the bungs in the hull to allow the water to come out as well.
If you don't have a pressure washer, you can give a one bucket hand wash, so keep reading on.
No pressure washer - Hand washing
If you don't have a pressure washer, this is not going to stop you from being able to wash the ski - you can easily hand wash it, with the following great gear. Likewise, after pressure Snow Jobbing, you can give it a quick hand wash if you wish, which appeals to those who really deeply love and want to show extra care for their ski.
Get one bucket (no need for our traditional two bucket wash here, unless you drive home from the ramp on dirty or wet roads) a Great Barrier Thingy placed in its base in case of the very small chance you pick up any heavier particles that could possibly scratch the ski. Use our Wax Wash as it has the best anti-rust properties of all our washes and the Shagamittastic or Love Glove wash mitt as your wash tool of choice for this job.
Fill your bucket with 3/4 of water, then add a capful of the Wax Wash and agitate with the hose to get a nice little head of wash suds. Dip your wash mitt into the bucket and begin washing the ski from top to bottom. Use a side to side motion instead of circular, as its generally more efficient and you don't tend to miss as many places. We like to use the Shagamittastic or Love Glove due to its lower profile, so it can get in and around all the intricate sections of the ski. The Shaggamittastic holds more suds, so we usually pick it here, but it's a personal preference. Our bigger more flat-surfaced wash tools like Muffy, Shagtastic and Wash Pillow tend to be too large for the intricate areas, so the overall wash won't be quite as good. You can also use one of our Foursome round detailing brushes for the hardest to reach areas if needed.
After washing, take the end off the hose and flood the panels, sheeting the water beads from the ski, making the following drying process a bit faster.
Your footwells by now will be full of water. To remove this, we use the wide Shaggamittastic (another reason we like using this wash tool) and push the sitting water out, before mopping up the last of it with the mitt itself.
Once you're done, empty the buckets and give them a good rinse out. You don't want to be storing any wash water for use later!
Drying time
Time to dry the ski now. As they usually have so many different areas water can hide in, we like to get a small portable air blower and use the air to force the water from these hidden areas. We also slowly/gradually open the different storage compartments around the ski to get the water out of those areas as well. Open them too fast and you will usually get a good amount of water ingress into the compartments, so open them slowly.
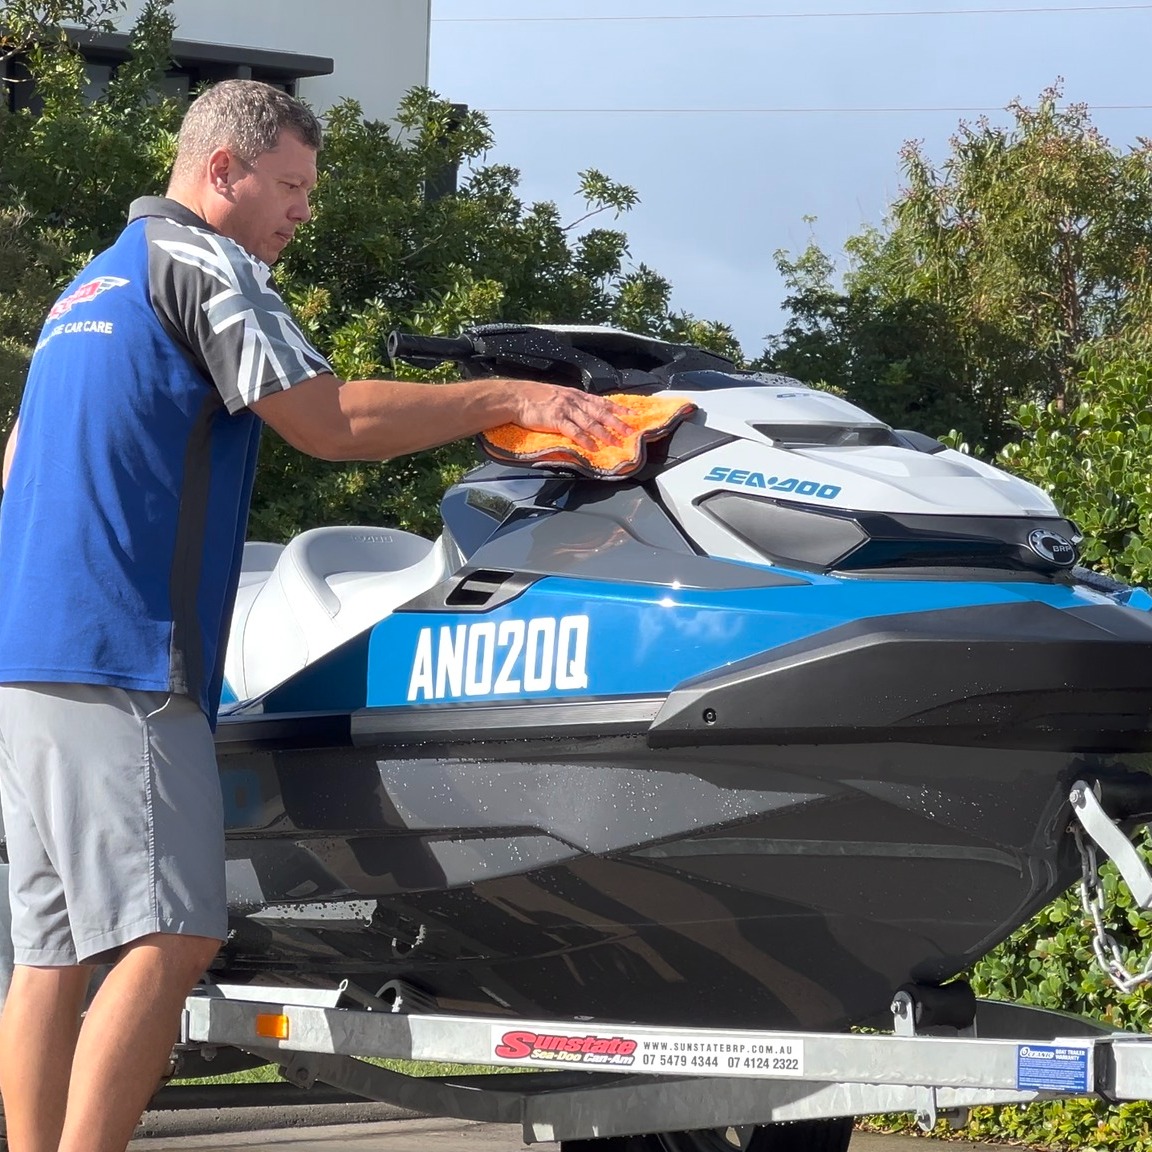
From here, we have a couple of ways you can dry your ski for a great finish. For the fastest way, use the Twisted Pro Sucker or Big Green Sucker drying towel and our Boss Gloss with them. The idea is to use the Boss Gloss as a “drying aid”, by using the Boss Gloss's hygroscopic (it absorbs water) nature, helping attract and absorb the water into the fibres of the drying towels, hence cutting drying time as well as adding very important lubrication to further minimise the chance of ever scratching your paint. Also with this technique, the Boss Gloss gives an amazing shine to your paint as well.
Get the Twisted Pro Sucker or Big Green Sucker and drape it over your arm with the bulk of the towel hanging down. Spray 4-6 sprays of Boss Gloss straight into the towel. Flip the towel over and spray another 4-6 sprays on the other side. Now dry the ski working from the top to bottom.
You can also use our After Glow drying aid if you're after a perfect finish - it takes a little bit longer with the two Big Softie cloth technique in its directions, but the result is always pretty fantastic with a really great shine.
Seat Cleaning and Care
Looking after your seat is quite easy, no matter if it's a fabric material or a vinyl finish. It's important for long term to keep it clean from mould, mildew, salt build up and sunscreen, plus other things that might get on it.
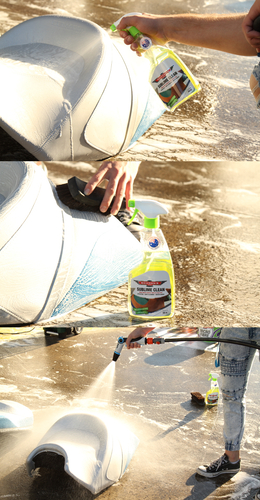
We use our Sublime Clean for thi - a gentle, environmentally safe cleaner. While the seat is removed to rinse down the engine, (it should be wet) spray the Sublime Clean all over the surface and then use our Plush Brush soft bristle brush and gently scrub the seat methodically down, paying extra attention to any stitching and joins.
If there are any areas that need extra attention, spray the Sublime Clean directly on to them and leave to sit for a minute before scrubbing once more. Note that with older neglected seats or stains, especially in vinyl, they can be difficult to bring back if they have been there a long time or are sun damaged. Regular cleaning after each ride or when you notice any new marks is the key to keeping them looking their best here.
Once you're happy with it, rinse it all down with a hose, then put it back on the ski at the end of the wash when it's time to dry it with the Big Green Sucker, or wait a few hours after drying so it airs the engine area out, just wipe over with the Big Green Sucker while off the ski. All nice and easy!
Time for some protection
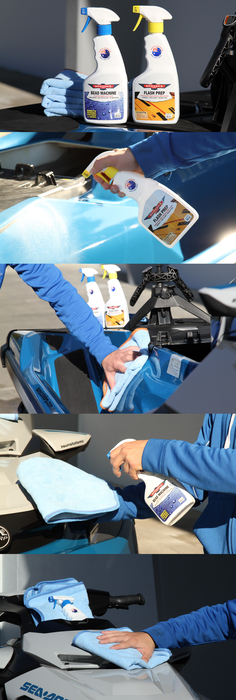
Once the ski is all dry you can now look at adding some needed protection. This is a simple combination of products we have been testing for the last year with fantastic success in the harsh marine environment. They protect as well as make the ski much easier to clean after future rides, as the surface is sealed and it makes it harder for anything to bond to the treated areas.
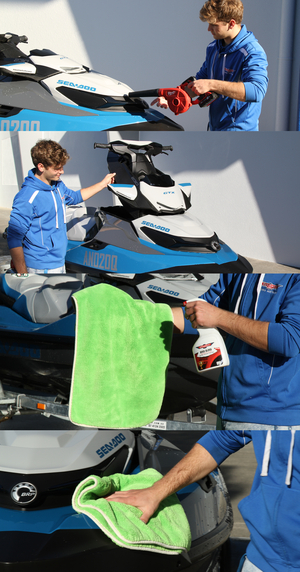
The first step is to get a bottle of Flash Prep and using it as per its directions - spray directly onto the hard surfaces, a section at a time. Gently rub in it in with one of our folded Big Softie microfibre cloths before it flashes off, for a nice clean finish. This step removes any oils or other products that could affect the bonding of our Bead Machine in next step of adding protection.
With the surface now nice and clean, have a bottle of our super hydrophobic Bead Machine ready. This will create awesome durable protection from the water and sun, as well as give an incredible shine in one quick step. Again, use it as per the directions by spraying it into a folded Big Softie microfibre cloth and then wiping the cloth evenly over a small surface at a time, in a side to side and then up and down motion. Then, use a 2nd dry and clean Big Softie cloth to buff off any final residue. Fold and turn this 2nd cloth often.
You can use Bead Machine on all the hard surfaces around the ski, including the ABS plastic bumpers, gauges and binnacles.
Quick after-wash maintenance of Bead Machine
After applying the Bead Machine, it's easy to keep it at its very best by quickly and easily maintaining it after a ride with another of our super hydrophobic products - Wet Dreams. We would apply this as an extra layer on the Bead Machine after your first ride/wash. Then, use it when you notice the water beading starting to diminish into the future.
This one is super easy to use, in fact it's so easy we call it one of the biggest cheats in car (or ski) care.
It is very important that you FOLLOW THE PRODUCTS DIRECTIONS as it's so fast in curing. Always use it in the shade and do a section at a time. You use this after the ski has been washed and still wet from the spray rinse off. We have two ways to apply it - spray the Wet Dreams in even, methodical strokes over the hard surfaces, then gently wipe over the area with a damp, folded Big Softie cloth to get an even covering of the surface. The other method is to spray it on directly, which is faster, but you don't always get as even of a finish. In both cases you only work in one area at a time and then rinse the Wet Dreams off well (as well as any adjoining areas any overspray could have drifted onto) with a strong jet of water right after applying. Continue doing this around the ski, enjoying the fresh bead porn on your steed, till you are all completed. Then dry it as per the above section.
It really does not get much easier for awesome, lasting protection.
We have another product called Happy Ending which gives a very similar finish to Wet Dreams. It's however applied with our Snow Blow Cannon and a pressure washer, but just be aware you need to use the stronger pressure of water from the lance to remove it. Following our wash advice above with more pressurised water from the lance, it's something we don't recommend in the interests of safety. We prefer using Wet Dreams and removing it as we go with the spray hose gun.
Black plastic bumpers and trims
One of the biggest things we get asked about for ski's is how to bring back the faded/greying hard black plastic textured bumpers and other mouldings on the ski's. We have a little something that works an absolute treat on this as well.
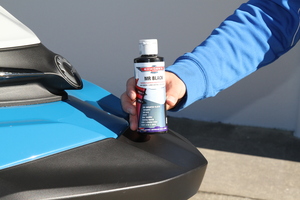
Mr Black is a trim restorer we developed over a few years. It brings back a beautiful darker finish - not silicone based, greasy or slippery. It's quite long lasting and won't wash off on the following rides, in fact we used it on one older ski and that sees weekly use and it lasted just on a year before needing to be done again. It has also become very popular with a lot of dealerships selling 2nd hand ski's all over Australia!
Use it in the shade, with dry conditions and the temperature between 15 and 30 degrees. Use Nitrile gloves, as it can stain your skin. Don’t get it on clothing, other fabrics or unsealed surfaces like concrete, as it can stain. If the plastics are more weathered and have an uneven finish, gently use the Magic Rub Bar melamine sponge with Sublime Clean on it first, to create a more even surface. If the plastic has “Tiger Stripes” or other prominent marks in it, be aware that Mr Black may not completely eliminate these.
Before we apply Mr Black, we use our Flash Prep spray to remove any dirt, oils or silicones from previously applied products from the surface. These oils can negatively affect the way Mr Black bonds to the plastic surface. Spray Flash Prep into one side of a folded Dirty or Dark Deeds (in a complete kit we call the Black Box) microfibre cloth, then liberally spray Flash Prep on the affected plastic trim and wipe it down well, flipping the cloth to a clean side often.
Shake the Mr Black bottle well. Work in small sections, like 1⁄4 of a bumper or a section of trim at a time.
Apply a few drops of Mr Black (less is more) evenly in our Black Apps foam applicator (these come in our Black Box, or can be purchased separately). Then, rub into one section of the trim, back and forth, to prime the applicator pad. Once it starts spreading well, give it an even, thin coat, over the plastic surface, using an overlapping motion.
If the plastic is very porous, it will absorb a bit more product. Don't over saturate or apply too much Mr Black to your applicator to compensate for this, add just one or two extra drops and continue with the overlapping thin coats, to give you the best result.
Leave to cure for a couple of minutes (this time can be less if it's overly warm or humid).
Now, go back over the area with a second dry and clean foam applicator, using gentle pressure and a side to side motion. This will level out any high spots and create a nice, even finish.
Wipe Mr Black from accidentally applied areas, like adjoining panels, headlights or glass, with a clean and dry, low pile microfibre cloth (or the Dark Deeds cloth in our Black Box kit). You can use a spray of Flash Prep in it for a little bit more cleaning power if you wish. Wipe in one fluid motion, then fold it to a dry, clean side, for a final wipe.
If marks are stubborn, or you don't notice them till much later, you can remove them with our Paint Cleanse & Restore.
We found in our testing that Mr Black will easily wipe off from most areas when freshly applied, which is why we don't make a big thing of masking off adjoining areas when using it. However, if your ski has single stage, unsealed paint, and you know you can be a bit messy, it can pay to mask that area off with a low adhesive painters tape before use.
Apply a couple more drops of Mr Black to the application foam and continue to the next section of trim. Always have an overlapping wet edge on larger trims, to ensure an even finish. Do not let it dry and come back later to it, as it can be difficult to match up the two areas.
Repeat the above steps till the job is all complete.
If the plastic is in poor condition it can be good to give it a second coat. Allow a 1 hour cure time before applying the next coat. As the surface is already sealed from the first coat, you will notice it uses a lot less product and is quicker to apply the second time around.
Do not cover or get it wet for 12 hours while it cures.
Wash any Mr Black from your skin with soap and water after use. Note that any cloth you use with Mr Black will become permanently stained.
You can use both Bead Machine and Wet Dreams over Mr Black once it is cured, which will further prolong the time between needing to re-coat it again.
Final tips
Some last little tips here - Try and get all the water from out of the hull if you have rinsed it down. Make sure the bungs are out and that you're on a level bit of ground. Lift the front trailer of the ski (if you can) and let the water run to the back to escape via the bung holes. Like we mentioned earlier, leave the seat off for a few hours afterwards so water can evaporate from this area. Do not forget to do the bungs back up before your next ride!
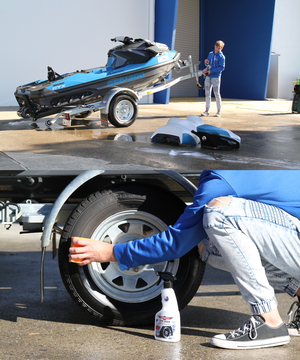
Dress your trailer tyres. These go in and out of salt water, so doing the sidewalls will both look good and keep them more supple over time. Use Tyre Sheen and apply by spraying into one of our All Sorts applicators for an easy, no mess job.
You should use a fitted cover on the ski if you are not going to use it for a long while or if it's kept outdoors. Nearly all the factory fitted covers can be treated with our Fabratection spray if they are kept outdoors, to increase the water repellency of them. Likewise you can wash the cover if it gets overly dusty, by wetting it first and then spraying on Sublime Clean and running over it with the wash mitt you have there. Rinse it with fresh water and dry with the Big Green Sucker if it's fitted to the ski, or hang out to dry if not. If you are washing it off the ski, be really sure the area you rest it on is totally clean, so foreign particles don't get into the soft inner liner and potentially scratch your ski!
Any questions?
If you have any questions on anything in this guide, please feel free to contact our team by calling FREE CALL 1800 351 308 or email us on info@bowdensown.com.au
I hope this guide helps you in looking after your water craft and further enjoying your time on the water.
Happy riding,
Dan Bowden